Menus

Tuesday 28 March 2017

Yii2 Dependent Drop Down Lists


Creating a Dependent Dropdown From in Yii2


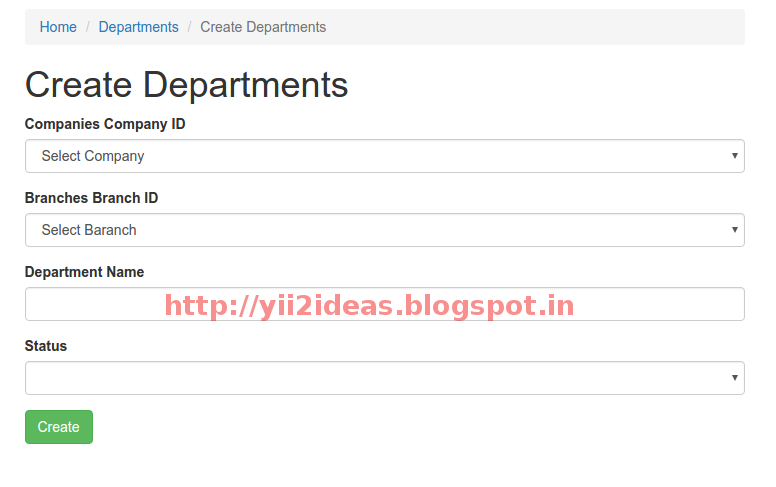
Company drop down list change to display corresponding branches display on branches drop down  list box.

First create table companies, branches and department

companies
company_id
company_name

branches
branch_id
companies_company_id
branch_name

departments
department_id
branches_branch_id
companies_company_id
department_name
status

* companies_company_id  set relation to company_id
* branches_branch_id set relation to branch_id


Create companies ,branches and departments crud operations .

Department create view _form.php code


<?php

use yii\helpers\Html;
use yii\widgets\ActiveForm;
use yii\helpers\ArrayHelper;
use backend\modules\test\models\Companies;
use backend\modules\test\models\Branches;

?>

<div class="departments-form">

    <?php $form = ActiveForm::begin(); ?>

 
    <?= $form->field($model, 'companies_company_id')->dropDownList(
 ArrayHelper::map(Companies::find()->all(), 'company_id', 'company_name'),
             ['prompt'=>'Select Company',
              'onchange'=>'
                $.post( "index.php?r=test/branches/lists&id="+$(this).val(), function( data ) {
                  $( "select#departments-branches_branch_id" ).html( data );
                });'
            ]); ?>
    
    
    <?= $form->field($model, 'branches_branch_id')->dropDownList(
 ArrayHelper::map(Branches::find()->all(), 'branch_id', 'branch_name'),
             ['prompt'=>'Select Baranch',              
            ]); ?>      

    <?= $form->field($model, 'department_name')->textInput(['maxlength' => true]) ?>

    <?= $form->field($model, 'status')->dropDownList([ 'Active' => 'Active', 'Inactive' => 'Inactive', ], ['prompt' => '']) ?>

    <div class="form-group">
        <?= Html::submitButton($model->isNewRecord ? 'Create' : 'Update', ['class' => $model->isNewRecord ? 'btn btn-success' : 'btn btn-primary']) ?>
    </div>

    <?php ActiveForm::end(); ?>

</div>


Note :
test/branches/lists  - create action lists in branches controller.
departments-branches_branch_id - id of branch drop down list controller.
Send company id send to branches controller lists action

The BrachesController.php


<?php

namespace backend\modules\test\controllers;

use Yii;
use backend\modules\test\models\Branches;
use backend\modules\test\models\BranchesSearch;
use yii\web\Controller;
use yii\web\NotFoundHttpException;
use yii\filters\VerbFilter;
use yii\helpers\ArrayHelper;


/**
 * BranchesController implements the CRUD actions for Branches model.
 */
class BranchesController extends Controller
{
    /**
     * @inheritdoc
     */
    public function behaviors()
    {
        return [
            'verbs' => [
                'class' => VerbFilter::className(),
                'actions' => [
                    'delete' => ['POST'],
                ],
            ],
        ];
    }

 
    public function actionLists($id)
    {
        
        $countBranches = Branches::find()
                ->where(['companies_company_id' => $id])
                ->count();

        $branches = Branches::find()
                ->where(['companies_company_id' => $id])
                ->orderBy('branch_id DESC')
                ->all();

        if($countBranches>0){
            foreach($branches as $branch){
                echo "<option value='".$branch->branch_id."'>".$branch->branch_name."</option>";
            }
        }
        else{
            echo "<option>-</option>";
        }
        
        //echo "<option>-</option>";

    }
 
 
.....
.....
.....

}


Yii 2.0: Creating a Dependent Dropdown From Scratch in Yii2


Related Links

YII2 CRUD Operations code with Gii
DropDownList

Yii2 Pjax Tutorial

Yii Tabular Input

Updating Gridview Using Pajax
Multiple submit button in Yii2 view forms


Thursday 16 March 2017

Reset auto increment after deleting a table row (Android-SQLite)


How to reset auto-increment int when deleting all data from database?

SQLite Reset Primary Key Field

Reseting SQLite autoincrement column


One method to set zero

UPDATE SQLITE_SEQUENCE SET SEQ=0 WHERE NAME='table_name';

Second method to set maximum of id in current table

There are two simple steps in resetting an auto increment field:

Find the highest number in the auto increment field

To find the highest number, run the following SQL command:
SELECT MAX( `column` ) FROM `table` ;

Replace 'column' with the name of the auto incrementing column. Replace table with the name of the table.
Example : SELECT max(id) as id FROM customerentries

Reset the auto increment field

The next step is to take the number that you get from the first command and auto increment from there. So add one to that number and run the following command:

UPDATE SQLITE_SEQUENCE SET SEQ=new_value WHERE NAME='table_name';

Replacing new_value with the result of the previous command plus one and replacing table with the table_name.

Example:
 /*autoincrement id reset max of id*/
    public void resetIdCustomerentries(){
        try {
        String selectQuery = "SELECT max(id) as id FROM customerentries";
        SQLiteDatabase database = this.getWritableDatabase();
        Cursor cursor = database.rawQuery(selectQuery, null);
        cursor.moveToFirst();
        int idc = cursor.getInt(cursor.getColumnIndex("id"))+1;
        //int idc = cursor.getInt(0)+1;
        String updateQuery = "UPDATE SQLITE_SEQUENCE SET SEQ= "+ idc + " WHERE NAME='customerentries'";
        database.execSQL(updateQuery);
        database.close();
    }
    catch (android.database.sqlite.SQLiteConstraintException e) {
        Log.e("TAG:", "SQLiteConstraintException:" + e.getMessage());
    }
    catch (android.database.sqlite.SQLiteException e) {
        Log.e("TAG:", "SQLiteException:" + e.getMessage());
    }
    catch (Exception e) {
        Log.e("TAG:", "Exception:" + e.getMessage());
    }
    }

This resetIdCustomerentries function reset next value of  autoincrement field id.

Click Here

Related Links


Saturday 4 March 2017

Set icon for android application


How can I set an icon for my android application?

Solutions for using set icon my android studio project

Steps

1 Choose icon picture copy this pic
2 Paste it into your project's res/drawable folder
3 Open manifest file and set 
    <application
   android:allowBackup="true"
   android:icon="@drawable/calendar"
   android:label="@string/app_name"
   android:supportsRtl="true"
   android:theme="@style/AppTheme">
.....
</application>
4 Run program


Show menu items in action bar


Friday 3 March 2017

Show menu items in action bar


Menu items are showing on action BAR


Android action bar was used to maintain a consistent navigation across the application. Menu list button show on action bar.

Screen shot


Android - Navigation


Overview of Action Bar

Action bar mainly contains four functional areas. They are app icon, view control, action buttons and action overflow.
App Icon – App branding logo or icon will be displayed here.
View Control – A dedicated space to display app title. Also provides option to switch between views by adding spinner or tabbed navigation.
Action Buttons – Some important actions of the app can be added here.
Action Overflow – All unimportant action will be shown as a menu.

Here the important xml attributes should be known are
android:icon – Defines the icon of the action item.
android:title – Title for the icon.
android:showAsAction – Defines the visibility of the action item. It accepts following values.
ifRoomDisplays the icon if there is space available on the screen
neverNever places this icon on the action bar
alwaysForces to display the icon always irrespective of space available. This way is not suggested.
withTextDisplays a text along with the icon. Normally the text value defined by android:title will be displayed
collapseActionViewDefines the action layout associated with it. This action view defined usingandroid:actionLayout or android:actionViewClass


Example

Add menu title set as res/values/strings.xml


<resources>

    ....
    <string name="entries">ENTRIES</string>
    <string name="entrieslist">ENTRIES LIST</string>
    <string name="salesreport">SALES REPORT</string>
    <string name="logout">LOGOUT</string>


</resources>


Create a new xml file under res ⇒ menu named main_actions.xml and add the following code. 
Here each <item> indicates each action item.

<?xml version="1.0" encoding="utf-8"?>
<menu xmlns:android="http://schemas.android.com/apk/res/android"
    xmlns:app="http://schemas.android.com/apk/res-auto">

    <item
        android:id="@+id/entries"
        android:title="@string/entries"
        app:showAsAction="never"
        />

    <item
        android:id="@+id/entrieslist"
        android:title="@string/entrieslist"
        app:showAsAction="never"
        />

    <item
        android:id="@+id/salesreport"
        android:title="@string/salesreport"
        app:showAsAction="never"
        />

    <item
        android:id="@+id/logout"
        android:title="@string/logout"
        app:showAsAction="never"
        />
</menu>


Now open your main activity class and do the following in onCreateOptionsMenu() method.


public class RptsalesreportActivity extends AppCompatActivity {


    @Override
    protected void onCreate(Bundle savedInstanceState) {
        super.onCreate(savedInstanceState);
        setContentView(R.layout.activity_rptsalesreport);

         ...............
    } 


    @Override
    public boolean onCreateOptionsMenu(Menu menu) {
        MenuInflater inflater = getMenuInflater();
        inflater.inflate(R.menu.main_actions, menu);

        return super.onCreateOptionsMenu(menu);
    }


    @Override
    public boolean onOptionsItemSelected(MenuItem item) {

         switch (item.getItemId()) {
        case R.id.entries:
            // code here
            return true;
        case R.id.entrieslist:
            //code here
            return true;
        case R.id.salesreport:
            //code here
            return true;
        case R.id.logout:
            //code here
            return true;      
        default:
            return super.onOptionsItemSelected(item);
        }
        
    }


}


Handling Action Bar Icon Click Events

Open your main activity and override onOptionsItemSelected() method. This method accepts menu item as a parameter. Selected action item can be identified by using it’s id. 


Thursday 2 March 2017

Android Long Press Event


Android Long Press Event


There are many situation in which your application needs to long press event.

  (viewitem).setOnLongClickListener(new OnItemLongClickListener() {           
        @Override
        public boolean onLongClick(View v) {
            //your code here
            return false;
        }
    }

Long Press Button Event Handler


Button button = (Button) findViewById(R.id.btn_NextLift);

button.setOnLongClickListener(new OnLongClickListener() { 
        @Override
        public boolean onLongClick(View v) {
            // TODO Auto-generated method stub
            return true;
        }
    });

Example of android long press event operation


XML file

<?xml version="1.0" encoding="utf-8"?>
<RelativeLayout xmlns:android="http://schemas.android.com/apk/res/android"
    xmlns:app="http://schemas.android.com/apk/res-auto"
    xmlns:tools="http://schemas.android.com/tools"
    android:layout_width="match_parent"
    android:layout_height="match_parent"
    android:paddingBottom="@dimen/activity_vertical_margin"
    android:paddingLeft="@dimen/activity_horizontal_margin"
    android:paddingRight="@dimen/activity_horizontal_margin"
    app:layout_behavior="@string/appbar_scrolling_view_behavior"
    tools:context="com.example.root.calendar.MainActivity"
    tools:showIn="@layout/activity_main"
    >


    <RelativeLayout xmlns:android="http://schemas.android.com/apk/res/android"
        xmlns:tools="http://schemas.android.com/tools"
        android:layout_width="match_parent"
        tools:context=".LongPress"
        android:layout_height="40dp"
        android:layout_alignEnd="@+id/calendarView">

        <TextView
            android:id="@+id/txtView"
            android:layout_width="wrap_content"
            android:layout_height="wrap_content"
            android:layout_alignParentBottom="true"
            android:layout_alignParentLeft="true"
            android:layout_alignParentRight="true"
            android:layout_alignParentTop="true"
            android:text="" />

    </RelativeLayout>


    <com.prolificinteractive.materialcalendarview.MaterialCalendarView
        xmlns:app="http://schemas.android.com/apk/res-auto"
        android:id="@+id/calendarView"
        android:layout_width="match_parent"
        android:layout_height="wrap_content"
        android:layout_marginTop="40dp"
        app:mcv_showOtherDates="all"
        app:mcv_selectionColor="#00F"
        />

</RelativeLayout>


Java File


package com.example.root.calendar;

import android.content.Intent;
import android.os.Bundle;
import android.support.v7.app.AppCompatActivity;
import android.support.v7.widget.Toolbar;
import android.view.View;
import android.widget.TextView;


public class MainActivity extends AppCompatActivity {

    @Override
    protected void onCreate(Bundle savedInstanceState) {
        super.onCreate(savedInstanceState);
        setContentView(R.layout.activity_main);


        TextView txtView = (TextView) findViewById(R.id.txtView);
        txtView.setOnLongClickListener(new View.OnLongClickListener() {
            @Override
            public boolean onLongClick(View v) {
                Intent intent = new Intent(MainActivity.this, LoginActivity.class);
                startActivity(intent);
                return true;
            }
        });


    }
}


Related Links

Event Handling in Android

Transfer Data Between Activities Using Intent
Android Programming Tips


Tuesday 28 February 2017

Transfer Data Between Activities Using Intent


user interface is displayed through an activity(Screen). Activity is used to represent the data to user and allows user interaction. In an android application, we can have multiple activities and they can interact with each other


Interaction between multiple activities can be done only using Intent. Intents are objects of theandroid.content.Intent type. Your code can send them to the Android system defining the components you are targeting. In Android app development you face situations where you want to send or receive your data between one Activity (Screen) to another. 


Calling one Activity from another in Android


Define an intent that will be sent to Activity2:
Intent launchActivity2 = new Intent(Activity1.this, Activity2.class);

Current activity Activity1 and the one you wish to open - Activity2.


Sample

Intent intent = new Intent(HomeActivity.this, EntriesActivity.class);
startActivity(intent);


Button entriesButton = (Button)findViewById(R.id.btnEntries);
entriesButton.setOnClickListener(new View.OnClickListener() {

    @Override    public void onClick(View v) {

        Intent intent = new Intent(HomeActivity.this, EntriesActivity.class);
        startActivity(intent);
    }
});


pass data between activities on Android

In your current Activity, create a new Intent:
Intent i = new Intent(getApplicationContext(), NewActivity.class);

i.putExtra("key","value");
startActivity(i);
Then in the new Activity, retrieve those values:
Bundle extras = getIntent().getExtras();
if (extras != null) {
    String value = extras.getString("key");
    //The key argument here must match that used in the other activity
}
Use this technique to pass variables from one Activity to the other.
Sample
Current activity
btnGenerate=(Button)findViewById(R.id.btnGenerate);
btnGenerate.setOnClickListener(new View.OnClickListener(){
    @Override    public void onClick(View view) {

        Intent myIntent = new Intent(RptsalesreportActivity.this, RptsalesreportdisplayActivity.class);
        myIntent.putExtra("day", "12");
        myIntent.putExtra("month", "2");
        myIntent.putExtra("year", "2017");
        startActivity(myIntent);

    }

});
New activity
Intent intent = getIntent();
String day = intent.getStringExtra("day");
String month = intent.getStringExtra("month");
String year = intent.getStringExtra("year");
value access by using getIntent() method.


Android Call An Activity class from a java class

Pass string value and Current Activity Context to function menuActions in Genfunctions class.
Java class like this
package com.example.root.calendar;

import android.content.Context;
import android.content.Intent;

public class Genfunctions {


    public void menuActions(String title,Context ct){

        //this.context=context;
        switch (title){
            case "ENTRIES":

                Intent intent = new Intent(ct, RptentrylistActivity.class);
                ct.startActivity(intent);
                break;
        }

    }//end of functions

}
Activity Class function call like this
Genfunctions gn = new Genfunctions(); gn.menuActions("ENTRIES",this);